前言
說到免費 VM,應該沒有人不知道 Oracle Cloud 的免費機器吧。不過 Oracle Cloud 對於 Free Tier 的 VM 有一個 很奇怪的政策,如下圖。
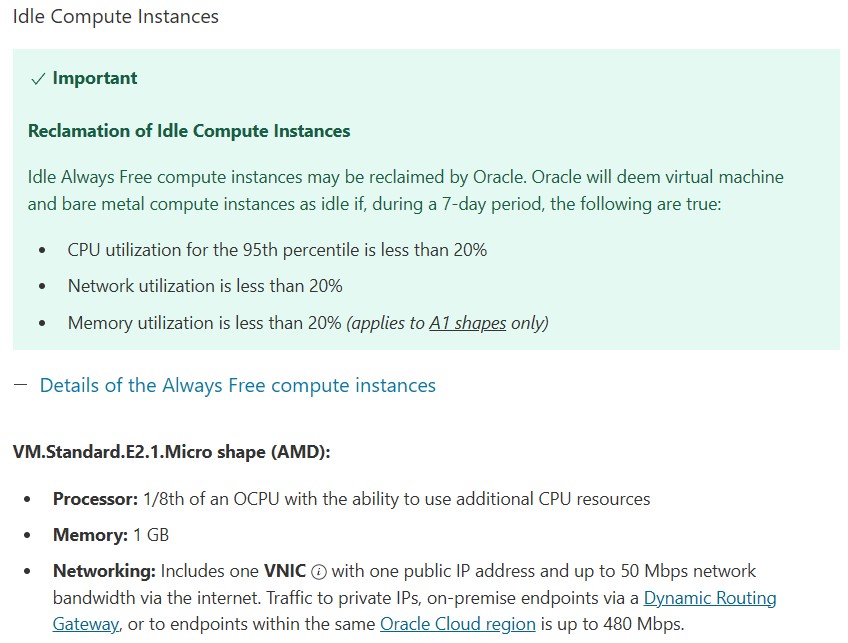
簡單來說,他希望資源是有在使用的,對於免費機器來說這還真是奇怪的要求。好吧,既然這樣我就提供我自己在使用的程式碼,能讓 CPU 保持在一定的使用率。
安裝程式語言
我這段程式碼是使用 NodeJS 寫的,所以你會需要安裝他。
sudo apt-get install -y nodejs
程式碼本體
程式碼由兩份檔案 run.js 及 process.js 組成,這份程式會產出一堆無意義的事情來占用 CPU,讓這台 VM 看起來有在使用。
檔案 run.js 的程式碼如下,其中 desiredLoadFactor 就是代表需要使用的 CPU 占用率,這就是依照個人喜好調整:
#!/usr/bin/env node

require(__dirname+"/process.js").startWatching();

var shouldRun = true;
var desiredLoadFactor = .5;

function blockCpuFor(ms) {
        var now = new Date().getTime();
        var result = 0
        while(shouldRun) {
                result += Math.random() * Math.random();
                if (new Date().getTime() > now +ms)
                        return;
        }
}

function start() {
        shouldRun = true;
        blockCpuFor(1000*desiredLoadFactor);
        setTimeout(start, 1000* (1 - desiredLoadFactor));
}

setInterval(function() {
    console.log("current process cpu usage: "+(global.processCpuUsage || 0)+"%");}
, 1000);

if (process.argv[2]) {
    var value = parseFloat(process.argv[2]);
    if (value < 0 || value > 1) {
        console.log("please give desired load value as a range [0..1]");
        process.exit(-1);
    } else {
        desiredLoadFactor = value;
    }
}
start();
檔案 process.js 的程式碼如下:
"use strict";
var fs = require('fs');

function ProcessUsageWatcher() {
    global.pubcrawler = global.pubcrawler || {};
    global.pubcrawler.processCpuUsage = 0;
}

ProcessUsageWatcher.prototype = {

    startWatching: function() {
        if (this.interval) {
            return;
        }

        var getUsage = function(cb){
            fs.readFile("/proc/" + process.pid + "/stat", function(err, data){
                var elems = data.toString().split(' ');
                var utime = parseInt(elems[13]);
                var stime = parseInt(elems[14]);

                cb(utime + stime);
            });
        };

        this.interval = setInterval(function(){
            getUsage(function(startTime){
                setTimeout(function(){
                    getUsage(function(endTime){
                        var delta = endTime - startTime;
                        var percentage = 100 * (delta / 500);
                        global.processCpuUsage = percentage;
                    });
                }, 5000);
            });
        }, 1000);
    },

    stopWatching : function()  {
        if (this.interval) {
            clearInterval(this.interval);
        }
    }
};

var instance = new ProcessUsageWatcher();
exports.startWatching = instance.startWatching;
exports.stopWatching = instance.stopWatching;
包成服務
接著我們將他寫成服務,前往 /etc/systemd/system 建立一個檔案名為 mycpu.service。
sudo vim /etc/systemd/system/mycpu.service
貼上以下內容(ExecStart 後面的目錄請做適當更改):
[Unit]
Description=mycpu.service
After=multi-user.target

[Service]
Type=simple
ExecStart=/usr/bin/node /var/mycpu/run.js
Restart=on-failure
RestartSec=5s

[Install]
WantedBy=multi-user.target
存檔後退出,輸入以下命令讓服務生效。
sudo systemctl daemon-reload
接著可以使用這個命令讓服務啟動並於開機時自動啟動。
sudo systemctl start mycpu ; sudo systemctl enable mycpu