前言
在很久以前的某一篇文章中,我寫過了 在 Linux 上啟用 TCP 壅塞演算法 - BBR,而其實你也可以在 Windows 啟用這項功能。而在 Windows 11 的 22H2 之後,它推出了基於 BBR 改進的 BBR2。
在 BBR2 中,他加入的對丟包的反應機制,不會像 BBR 一樣基本忽略掉包。當出現丟包的狀況時,BBR2 就會像傳統算法一樣適度減速,來降低重傳並提高與其他網絡流量的公平性。
☆ 請注意,在絕大部分時間你可能不需要這麼優化,因為這可能為你帶來其他問題,請確定你有自己解決的能力再這麼做。
操作方式
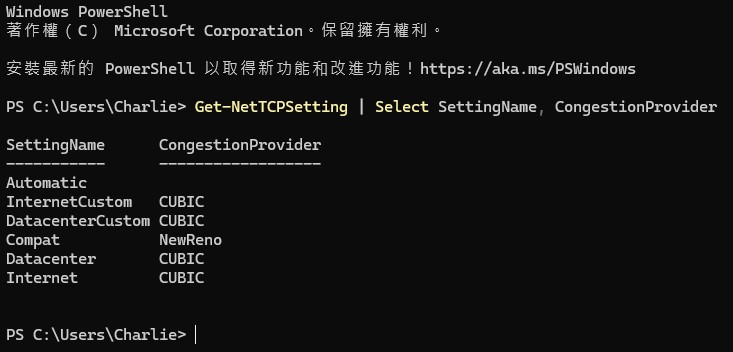
首先,先使用系統管理員的身份開啟 Powershell,並輸入以下命令,來查看目前電腦都使用哪種算法。
Get-NetTCPSetting | Select SettingName, CongestionProvider
在預設的情況下,你應該會看到以下結果:
接著,你可以使用以下命令來將其改成 BBR2。
netsh int tcp set supplemental Template=Internet CongestionProvider=bbr2
netsh int tcp set supplemental Template=Datacenter CongestionProvider=bbr2
netsh int tcp set supplemental Template=Compat CongestionProvider=bbr2
netsh int tcp set supplemental Template=DatacenterCustom CongestionProvider=bbr2
netsh int tcp set supplemental Template=InternetCustom CongestionProvider=bbr2
執行完成後,你可以再次使用第一次的命令來驗證他。
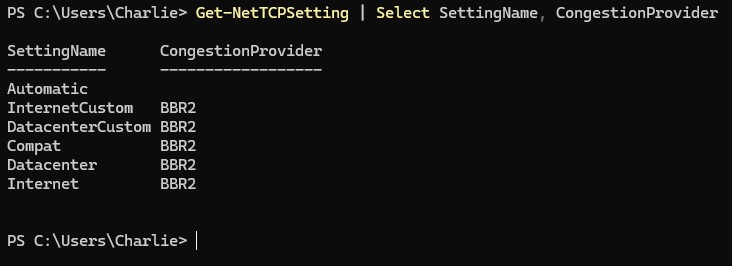
這樣就算完成囉。
恢復預設
如果你想要恢復預設值,只需要執行以下命令即可:
netsh int tcp set supplemental template=internet congestionprovider=CUBIC
netsh int tcp set supplemental template=internetcustom congestionprovider=CUBIC
netsh int tcp set supplemental Template=Compat CongestionProvider=NewReno
netsh int tcp set supplemental template=Datacenter congestionprovider=CUBIC
netsh int tcp set supplemental template=Datacentercustom congestionprovider=CUBIC
接著再次執行 Get-NetTCPSetting | Select SettingName, CongestionProvider 驗證即可。